This article explains how to configure Oracle Golden Gate software to perform a unidirectional replication from a source non-CDB database on Oracle 12c to a target pluggable database on Oracle 19c. One possible use case is if you need to migrate from your non-CDB database to a pluggable database with the least downtime possible.
The instructions provided below assumes the following; Oracle database and Golden Gate software are already installed. Both databases are open, in ARCHIVELOG MODE, accessible, and have entries in the tnsnames.ora file. Oracle user environment variables are set.
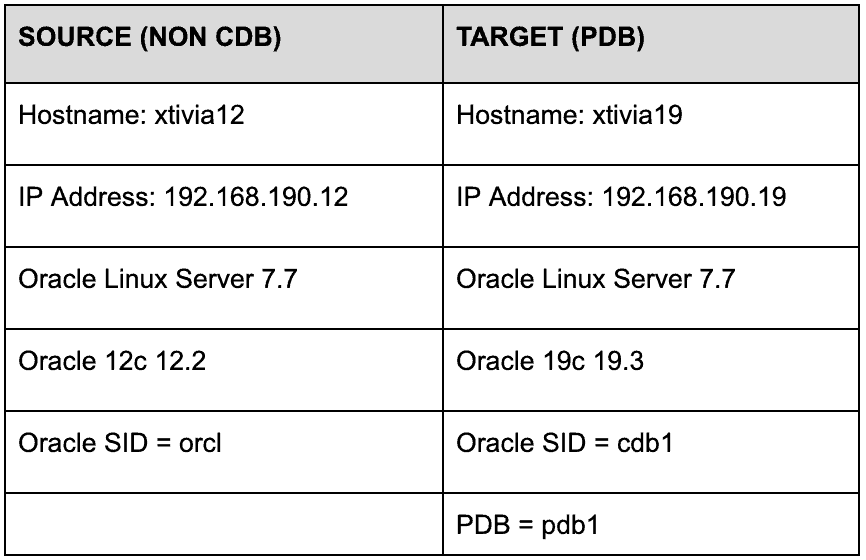
For this tutorial, here are the environment details:
The source database is loaded with the sample HR schema and another user-created schema. If you need sample data, you can use the demo scripts provided in the Oracle Golden Gate installation directory.
1. Start of SOURCE system setup
- Source Database Setup:
Login to sqlplus as SYS user on the source system.
SQL> ALTER DATABASE FORCE LOGGING;

SQL> ALTER DATABASE ADD SUPPLEMENTAL LOG DATA;

SQL> ALTER SYSTEM SET enable_goldengate_replication=TRUE SCOPE=BOTH;- If you are looking to optimize the performance of the golden gate process, adjust the database initialization parameter STREAMS_POOL_SIZE high enough to keep enough memory available for the integrated extract and replicat processes, taking into account the other components that use streams pool.
Query DBA_GOLDENGATE_SUPPORT_MODE to get information about supported objects in your schemas. Consult the Golden Gate documentation for other support types and how to handle replication.
SQL> select * from dba_goldengate_support_mode;

OWNER                OBJECT_NAME          SUPPORT_MODE
-------------------- -------------------- ---------------
HR                   REGIONS              FULL
HR                   COUNTRIES            FULL
HR                   LOCATIONS            FULL
HR                   DEPARTMENTS          FULL
HR                   JOBS                 FULL
HR                   EMPLOYEES            FULL
HR                   JOB_HISTORY          FULL
XT                   LARGE_TABLE          FULL
- Create User and Grant Permissions
SQL> CREATE USER ggadmin IDENTIFIED BY ggadmin
DEFAULT TABLESPACE users
QUOTA UNLIMITED ON users;
SQL> GRANT DBA TO ggadmin;
SQL> EXEC dbms_goldengate_auth.grant_admin_privilege('ggadmin');
- Enable Supplemental logging at the schema level
Run GGSCI on source system
GGSCI (xtivia12) 1> DBLOGIN USERID ggadmin, PASSWORD ggadmin
GGSCI (xtivia12 as ggadmin@orcl) 2> ADD SCHEMATRANDATA hr
GGSCI (xtivia12 as ggadmin@orcl) 3> ADD SCHEMATRANDATA xt
- Configure Manager parameter
Before editing any parameter files, you need to be in the Oracle Golden Gate home directory. From there, you can start GGSCI.
GGSCI (xtivia12) 1> EDIT PARAM mgr

PORT 7809
PURGEOLDEXTRACTS ./dirdat/et* , USECHECKPOINTS, MINKEEPHOURS 72
AUTORESTART ER *, RETRIES 3, WAITMINUTES 5, RESETMINUTES 60
DOWNREPORTMINUTES 15
LAGCRITICALSECONDS 10
LAGINFOMINUTES 0
LAGREPORTMINUTES 15
ACCESSRULE, PROG *, IPADDR 190.168.190.19, ALLOW
- Configure Extract parameter file
GGSCI (xtivia12) 2> EDIT PARAM extgg

EXTRACT extgg
DISCARDFILE ./dirrpt/ extgg.dsc, APPEND
EXTTRAIL ./dirdat/et
--- User login
USERID ggadmin, PASSWORD ggadmin
--- DDL Parameters
DDL INCLUDE MAPPED
DDLOPTIONS REPORT
TABLE HR.* ;
TABLE XT.* ;- Configure Extract Pump parameter file
GGSCI (xtivia12) 3> EDIT PARAM epgg

EXTRACT epgg
RMTHOST 192.168.190.19, MGRPORT 7809
PASSTHRU
RMTTRAIL ./dirdat/rt
TABLE HR.* ;
TABLE XT.* ;
- Creating Golden Gate Processes and Trail Files on Source Server
GGSCI (xtivia12) 1> DBLOGIN USERID ggadmin, PASSWORD ggadmin
GGSCI (xtivia12 as .. 2> REGISTER EXTRACT extgg, DATABASE
GGSCI (xtivia12 as .. 3> ADD EXTRACT extgg, INTEGRATED TRANLOG, BEGIN NOW
GGSCI (xtivia12 as .. 4> ADD EXTTRAIL ./dirdat/et, EXTRACT extgg, MEGABYTES 200
GGSCI (xtivia12 as .. 5> ADD EXTRACT epgg, EXTTRAILSOURCE ./dirdat/et
GGSCI (xtivia12 as .. 6> ADD RMTTRAIL ./dirdat/rt, EXTRACT epgg, MEGABYTES 200
2. Start of TARGET System Setup
- Target Database Setup
Login to sqlplus as SYS user on the target system, run the command in the root container.
SQL> ALTER SYSTEM SET enable_goldengate_replication=TRUE SCOPE=BOTH;- Create User and Grant Permissions
To create a common user, you must be connected to the root. You can optionally specify CONTAINER = ALL, which is the default when you are connected to the root.
SQL> CREATE USER c##ggadmin IDENTIFIED BY ggadmin
DEFAULT TABLESPACE users
QUOTA UNLIMITED ON users;
SQL> GRANT DBA to c##ggadmin CONTAINER=ALL;
SQL> exec dbms_goldengate_auth.grant_admin_privilege( grantee => 'c##ggadmin',
container => 'ALL');
- Target Manager parameter
GGSCI (xtivia19) 1> EDIT PARAM mgr

PORT 7809
PURGEOLDEXTRACTS ./dirdat/rt* , USECHECKPOINTS, MINKEEPHOURS 72
AUTORESTART ER *, RETRIES 3, WAITMINUTES 5, RESETMINUTES 60
DOWNREPORTMINUTES 15
LAGCRITICALSECONDS 10
LAGINFOMINUTES 0
LAGREPORTMINUTES 15
ACCESSRULE, PROG *, IPADDR 190.168.190.19, ALLOW
ACCESSRULE, PROG *, IPADDR 190.168.190.12, ALLOW - Target Replicat parameter file
GGSCI (xtivia19) 1> EDIT PARAM repgg

REPLICAT repgg
DISCARDFILE ./dirrpt/repgg.dsc, APPEND
DBOPTIONS ENABLE_INSTANTIATION_FILTERING
ASSUMETARGETDEFS
USERID c##ggadmin@pdb1, PASSWORD ggadmin
DDL INCLUDE ALL
DDLOPTIONS REPORT
MAP HR.*, TARGET pdb1.HR.*;
MAP XT.*, TARGET pdb1.XT.*;
parameter DBOPTIONS ENABLE_INSTANTIATION_FILTERING allows us not to record and use the current_scn during the initial load.
- Create Target Replicat Group and Trail Files
GGSCI (xtivia19) 1> DBLOGIN USERID c##ggadmin@pdb1, PASSWORD ggadmin
.. 2> ADD CHECKPOINTTABLE c##ggadmin.chktbl
.. 3> ADD REPLICAT repgg, INTEGRATED, EXTTRAIL ./dirdat/rt, CHECKPOINTTABLE c##ggadmin.chktbl
3. Start Golden Gate Processes Before Target Instantiation
- Start Manager processes on both Source and Target
GGSCI (xtivia12) 1> START mgr
GGSCI (xtivia19) 1> START mgr
- Start Extract and Extract Pump Process on Source Environment
GGSCI (xtivia12) 1> START EXTRACT extgg
GGSCI (xtivia12) 2> START EXTRACT epgg
To check if the processes are running, enter “info all” on GGSCI. If the processes are not running, check the error log in the golden gate home directory (ggserr.log).
GGSCI (xtivia12.oralinux) 1> info all
Program 	Status      Group   	Lag at Chkpt  Time Since Chkpt
MANAGER 	RUNNING
EXTRACT 	RUNNING     EPGG    	00:00:00  	00:00:08
EXTRACT 	RUNNING     EXTGG   	00:00:00  	00:00:07
4. Start of Target Instantiation
For the initial load, we will be using Oracle Data Pump to export and import the schemas. With Oracle Golden Gate version 12.2 and above, we no longer need to know what CSN number Replicat should be started with. Replicat will handle it automatically when the Replicat parameter “DBOPTIONS ENABLE_INSTANTIATION_FILTERING” is set.
It is also important to note, before starting any instantiation method, that you need to make sure that all open transactions that existed when the real-time extract was started are completed.
- Datapump Export on Source
expdp system/password directory=DPDIR schemas=HR,XT dumpfile=EXPORT.dmp- Datapump Import on Target
impdp system/password@pdb1 directory=DPDIR dumpfile=EXPORT.dmp5. Start Replicat on Target System
GGSCI (xtivia19) 1> START REPLICAT repggAt this point, you can test the replication process and start processing transactions on the source side.